

If you’re like most people, your RV is the perfect place to escape reality and explore new places. But what if you want to explore your RV while still being connected to the outside world? You can do more than just watch TV or plug in your phone charger with the proper hookups.
The right hookups make it possible to cook in the kitchen, shower, wash clothes, and even charge your laptop so you can work while you travel. In this article, we’ll walk you through the steps for installing the RV hookups you’ll have to follow when you’re out on the road.
We’ll start by introducing you to the three main types of hookups you’ll use. Then we’ll show you how to wire them up to your RV battery and generator system. And finally, we’ll cover some basic safety considerations to keep in mind when installing these hookups. Let’s get started!
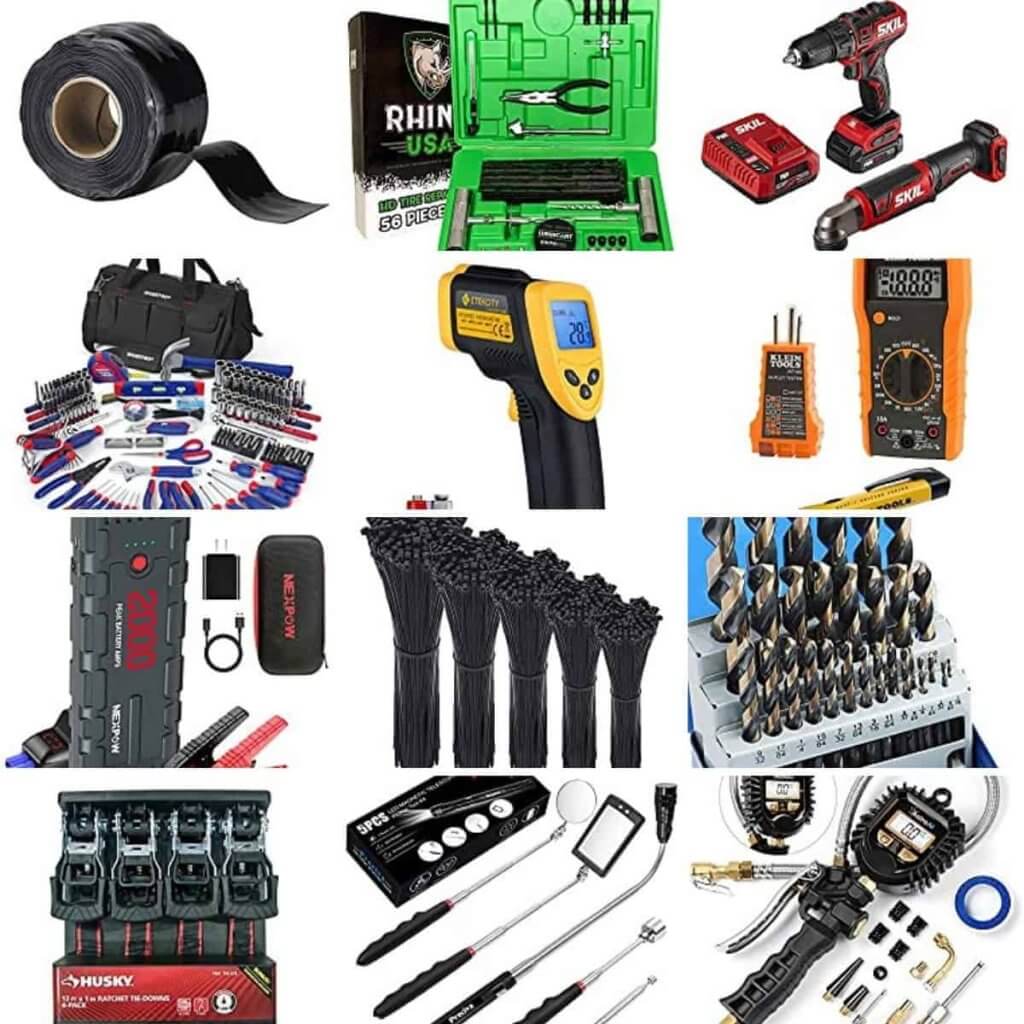
Before jumping on directly to the main part, let’s have a look over what one should have in the basic toolkit. Confused about what to include in your little toolkit? Well, we got a small list up here for you:
- Hammer/Rubber Mallet Combo
- Pilers
- Duct Tape
- Wire Cutters
- Utility knife
- Screwdrivers
- Heavy-duty work gloves
- Flashlight
- Multimeters
- Lubricant
How to Install RV Power Hookup
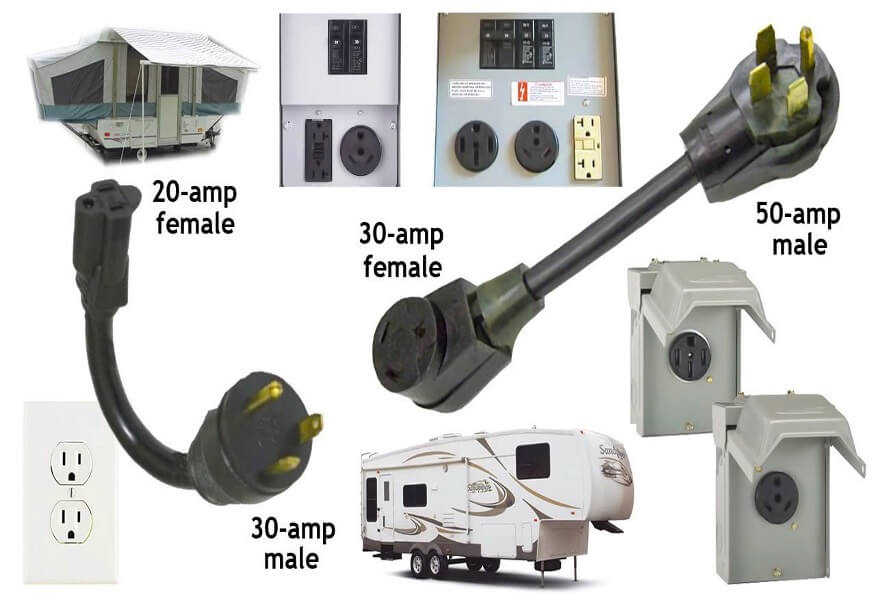
The power hookups that you’ll install on your RV will depend on what kind of power source you’re using. If you’re using a campground’s electricity, then you’ll probably just have to install a 30-amp power hookup. However, if you are planning to camp somewhere off the grid, such as at a state park or a remote beach, then you’ll have to install a 50-amp power hookup.
With that being said, let’s have a look at how to set up the power hookup:
- Switch off the main circuit breaker
- Near the area where you intend to park your RV, mount the pedestal or outlet. Make sure the mounting location is secure by testing it, then follow the kit’s instructions.
- Without touching the live wires connected to the main breaker terminals, insert the new breaker into the vacant slot. Make sure that your main breaker is off.
- Before connecting the wires to the outlet and pedestal, run the wires through the conduit. A basic rule is that the wire must pass through a shield above ground and extend 18 inches below ground.
- Join the wires to the breaker after that. The white neutral wire connects to the neutral bus, and the green ground wire connects to the ground bus. After that, join the new 30-amp breaker’s terminal to the black 120-volt hot wire.
- Move to the pedestal or outlet after the wires have been connected to the breaker box. You’ll likely find the terminals on the pedestal or a different receptacle; they are usually clearly labeled on the back of the outlet.
- The green ground wire should be connected to the terminal with the green label at the back of the U-shaped hole. The terminal marked “white or neutral” (typically a silver screw) is located in the 210-degree position on the back of the outlet. Attach the white neutral wire to this terminal. The hot terminal, which is typically a brass-colored screw, is where the black 120V hot wire attaches to the outlet at the 150-degree mark.
- Finally, make sure the connections are good, and you’re good to go!
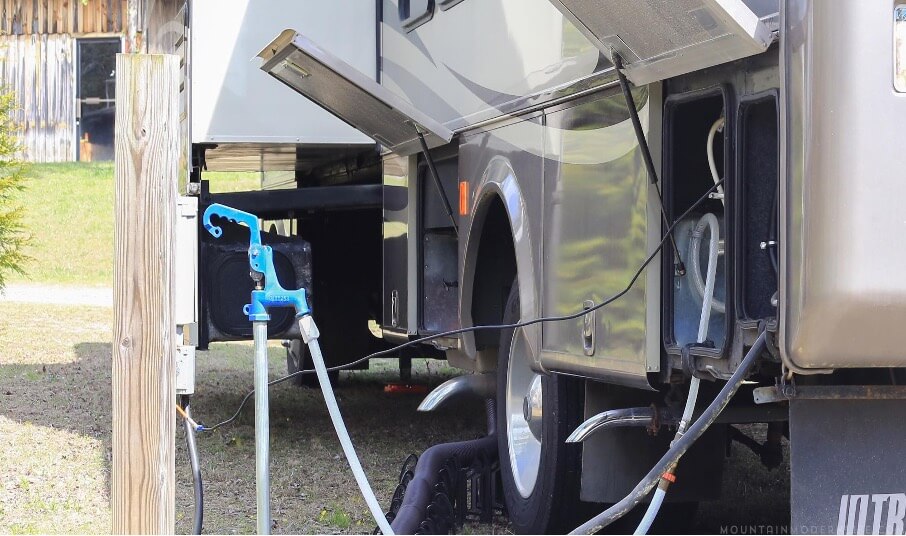
How to Install RV Water Hookup
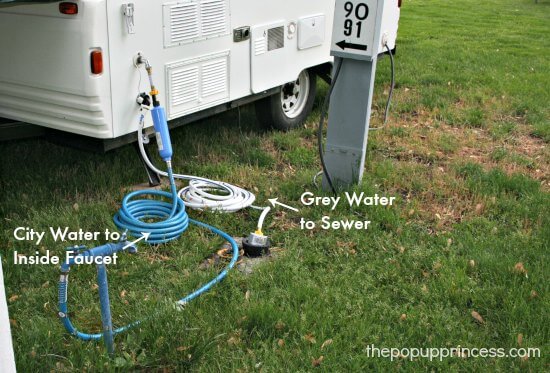
You’ll require a water hookup in order to use your RV’s toilet and shower. And you’ll need to join your sewer hose to the sewer outlet on your campsite to flush the toilet when it’s full. If you want to wash dishes or take a shower, you’ll need to connect a freshwater hose from the water tank in your RV to the freshwater faucet on the campsite. Water hookups come in three different sizes: 30, 50, and 90 gallons per minute.
The steps to follow to fit a water hookup are:
- Locate the freshwater drinking hose for your trailer, RV, or motorhome. Use a water filter, which you should attach at this point if you’re unsure of the quality of the water where you’re camping. You might also want a water pressure regulator to prevent your water line from being damaged by too much pressure. At this point, you should also connect your regulator to your hose.
- Put the hose’s other end into the water supply hookup at the campground.
- A switch in your RV’s water system lets you choose between using city water or water from your RV tank. If you are connected, check that it is set to city water. You need that switch to indicate your tank when boondocking.
- Be sure your RV water pump is on while using water to ensure that it comes out of sinks and showers when needed.
- Also, be sure your water heater is turned on.
How to Install RV Sewer Hookup
A sewage dump station will usually have a drain pipe leading to the local sewer system. You’ll need to install a sewer hookup from your RV’s black tank to the sewage drain pipe to use this drain pipe. There are three types of sewer hookups: 20-gallon plastic tanks, grey tanks, and black tanks.
A black tank is the cleanest option because it contains waste that has not been exposed to the environment. A grey tank is slightly less sanitary than a black box, but it’s usually easier to use because you can pour the contents of the tank out instead of having to empty the entire tank by hand.
A plastic tank is less sanitary than a black or grey tank because it doesn’t contain any chemicals that can neutralize the waste it contains. However, the most comfortable option is the black tank because it is the least exposed to contamination.
Guide to joining the sewage hookup:
- A house RV sewer hookup may be installed in a few different ways. For example, they are installing a sewer tank, connecting to your septic system, or connecting to the current public sewer system.
- The simplest approach to empty your black and grey water tanks is to hook up to your current public sewer system; however, depending on where you reside, this may be prohibited. Therefore, you must confirm with your local government before attempting to connect in this manner. However, if it’s permitted, it’s as easy as connecting your sewage at a campsite. Simply locate the sewer cap in your yard, take it off, and connect the sewer line.
- If your property has a septic system, the procedure is identical; however, you might require to construct a 4-inch pipe from the septic holding tank so that you have something to connect to.
- The final option for the sewer hookup issue is to install an RV in-ground septic tank in your yard because it may be quite expensive to bury a holding tank. You will also need to pay to have it pumped out as necessary once it is installed. The septic tank would likely need to be installed by a professional as well, after which you can just connect up as at a campsite.
Some Additional Tips
If you’re looking to cut out some work in exchange for a few bucks, then using compost toilets could be a great alternative. These eco-friendly toilets keep the solid and liquid waste in different compartments. As a result, the liquid wastes are got rid of at a proper place when the liquid compartment is full.
While for solid waste, it is put in a biodegradable environment. Don’t worry; the setup is such that the solid waste will be converted to compost before it starts smelling ill. Compost toilets are not a cheap option, but if you’re looking to work less and have a great natural fertilizer for your garden, then investing in composting toilets is not a bad choice.
The steps suggested above are evidence that the process of installing the power, water, and sewage hook-up is not an easy one. Hence, if you’re going low on time and patience, then taking some professional help is a good option. The experience and perfection they carry with them can help you get things done in much less time.
Conclusion
One should research their recreational vehicle properly, look out for the requirements and choose the different hook-ups wisely. Choosing something which is over the demands can lead to a hole in your pocket, while going for something that doesn’t meet your requirements properly can lead to uninvited problems during your next trip. Once decided, one should read the manual instructions properly and with care and go through each and every step carefully.
Even a little hustle and bustle caused might lead to accidents you are never ready for. For example, if you directly check the main breaker after switching it off, there are chances that you might get current. One should use proper tools devised for that particular aim to check the current status. This brings us to the next important point: carry your tools everywhere. It doesn’t matter if your RV is a brand new one or if you just had it serviced; the problems don’t have invitation. Hence, it’s always better to carry your toolkit.
These are just the basic tools that you are expected to carry over in order to at least bring some basic solution to any unforeseen accidents. Of course, if you’re having these in your RV back, then there’s no need to worry- at least for some time.