
Thinking of installing a fifth wheel to your RV or trailer truck? Unsure about using an Andersen hitch? Worried about having an Andersen hitch failure? Well, you must stop worrying as of this moment because we are here for you and your RV.
With the traveling season on the verge, questions as such are normal to pop up, and luckily, we have researched, analyzed, experimented, and sorted the best way out for you. The kingpin style attachment for the fifth wheel trailer pin box is a gift for a safe, secure, and smooth ride. Not only do Andersen hitches improve a ride, but they also butter up your entire traveling experience.
Read along and follow our tips, tricks, and procedures to get ultimate, failure-free Andersen hitch installation results in just one go.
Installing an Andersen Ultimate Fifth Wheel Connection Hitch to An RV
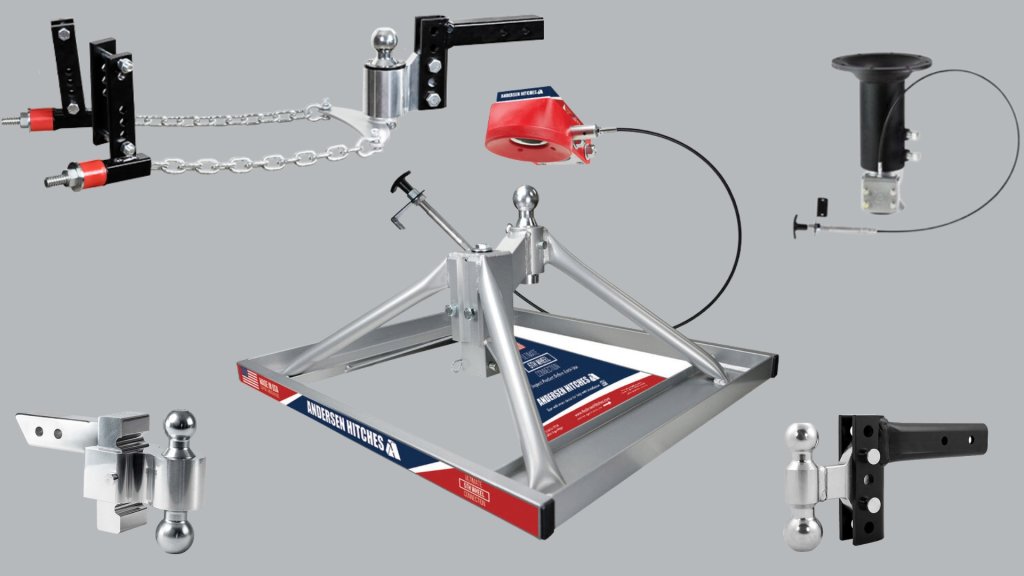
Andersen hitches come with elaborate manuals and easy installation techniques. However, reading them in one go might cause jumbles in your head, so we have it all simplified here in this blog.
Read along to understand and install the Andersen Ultimate Fifth Wheel hitch as easily as possible.
Like every other handyman, there are some basic tools you must have at your disposal before getting the box of Andersen hitch. Let’s look at what exactly you need to install a hitch to your RV.
- Measuring Tape
- 5/16” socket (this is needed for the self-tapping screws)
- ¼” Allen Wrench (this must be at least two inches long)
- Torque Wrench (Make sure this one can afford at least 40-ft lbs of torque)
Steps to Install an Andersen Hitch
Now that we know what we need, it’s time we look at the steps we will take to install an Andersen hitch.
Follow our lead, and let’s get going.
Step 1: Clearance is the key
Understand your fifth-wheel hitch. There is always a point in your vehicle after which it connects to a tow vehicle. After understanding your vehicle, you must clear out the space. Here is how you do it.
- Get a tape measure and measure out the distance of the center of the coupler of the block ball socket to the farthest corner of the trailer.
- Now measure the ultimate ball to the back of the cab (on your tow vehicle).
- If the measurement you have derived in Step 1 is shorter than what you have derived in Step 2, then you almost have the perfect clearance. However, too much perfection is not required in this case, as most RVs work pretty well with almost 60-70 degrees of turning clearance only.
Step 2: Let’s Install the Base Unit
Determine the size of your RV or trailer truck. If your RV has a standard or long bed, you have to attach the base closer to the cab of the truck using a ball closer, and if you have a truck with a shorter bed size, you will be installing the base pretty close to the tailgate using a ball closer. Once this is made clear, let’s see how we will do this.
- Make sure that your industry standard rails are perfectly attached. Now, place the base of the Andersen Ultimate Connection Hitch into the center of these rails. Remember that these rails should center from left to right in the tow vehicle bed.
- Put the four rail pins given in the package in the assigned holes of the rail and base. Now, ensure they are secure and in place using the clips provided to you.
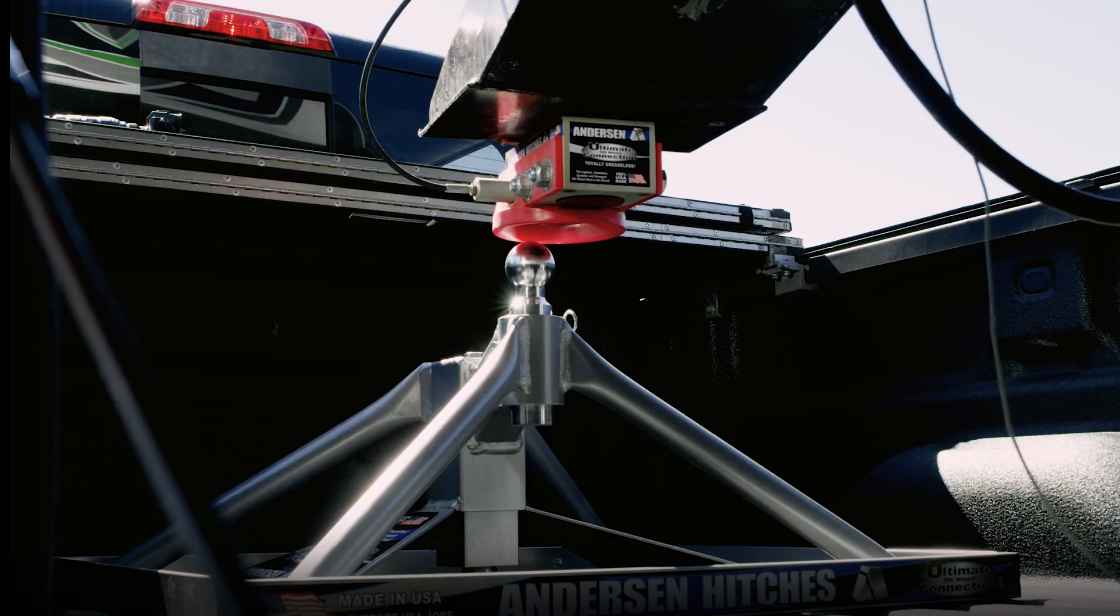
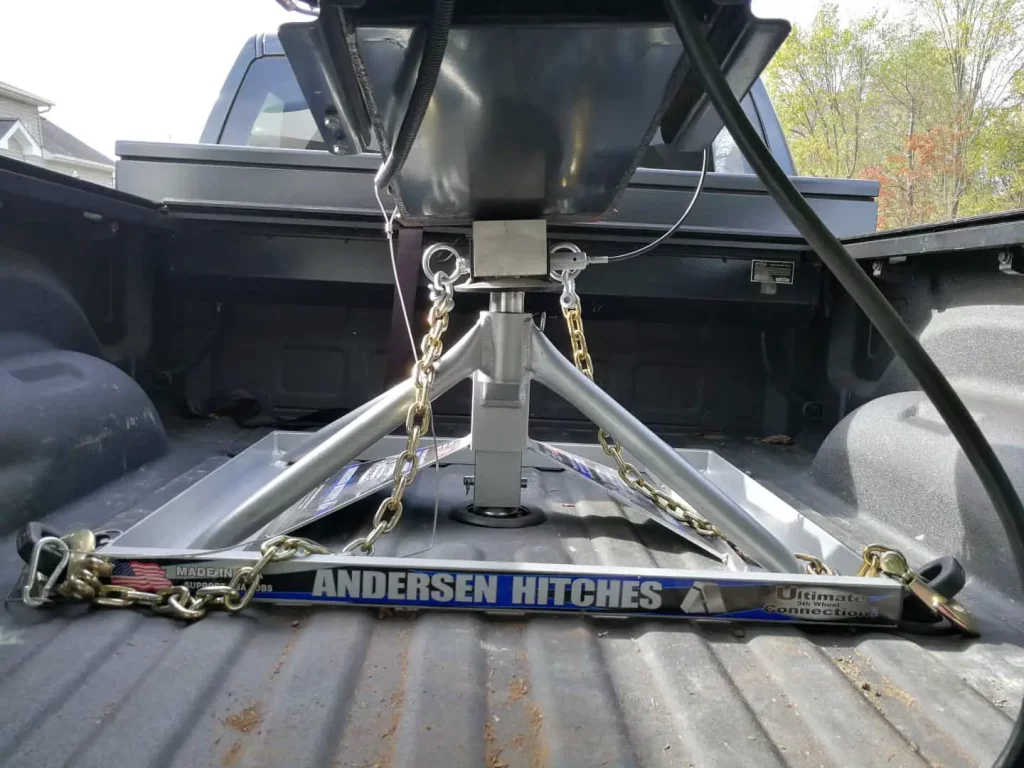
- Now, it’s time to insert the 2-5/16” ball in the base and make sure it is secure using the clips and pins provided to you.
Step 3: Time for The Kingpin Coupler Block
There should be necessary and adequate clearance between the tailgate and the side rail of an RV. Here is how you are going to do this:
- Make a hundred percent sure that the center of the coupler block’s ball socket, which is attached to the rear of the trailer’s pin box, is shorter than the ultimate ball at the tailgate and the side rail.
- Now, very carefully, you must place the kingpin coupler block on the trailer kingpin. Make sure that it is facing downwards and that the ball socket is completely greaseless. Remember, it’s still not time to attach the remote latch cable brackets.
- Now, you have to hold the coupler block on the kingpin. To do this, use the 5” kingpin bolts in their associated holes and use the washers and nuts on the bolts. Do not tighten them yet.
- Ensure that the coupler block is in the center (on the pin box). Now, take a ¼” Allen Wrench and tighten all four set screws placed to 40 ft-lbs of torque.
- Now, using a wrench, tighten all the nuts left on the kingpin bolts. Make sure they are snug and do not overtighten them.
Step 4: Placing the Remote Latch Cable Brackets
Understand why remote latch cable brackets are important first. It is because if not attached otherwise, the cables might have sharp kinks or turns in them. So, to avoid such deformities, remote latch cable brackets come to the rescue. This leads the cable to function well without the concerns of binding.
Now, let’s see how it is done.
- Install the two self-tapping screws provided to you in the package using a 5/16” socket.
- It is done. Now check whether the handles are working effectively in and out.
Step 5: Connecting the Base Unit and The Trailer
Pull and open the remote latch cable before the connection. We are now at the second, last, and most important step of the process. It’s time to attach the base unit of the Andersen Ultimate Connection Hitch to the Kingpin coupler or your trailer. Let’s see how we can do this.
- Open the latch cable brackets. Bring the tow vehicle now, right below the trailer, until the Ultimate Ball is right below the Kingpin Coupler.
- Keep lowering the trailer until it fully rests on the Ultimate Ball, ensuring it is perfectly inside the socket of the coupler’s block.
- Push in the remote latch handle to secure the Coupler Block. Now lock the handle by turning it full to 90 degrees in either of the directions
Step 6: Time to Remove the Base Unit
We are almost done. Now it’s time to remove your base unit and free up your RV’s bed. To do so, all you have to do is:
- Completely remove all the rail pins by removing the clips.
- Lift straight the base unit until the installation tabs clear out the rails.
Final Thoughts
This was all about installing an Andersen hitch, and that, too, in the easiest way possible. All you have to do now is order an Andersen Ultimate Fifth Wheel Hitch and get done with towing easily by following these steps. We have included all the tips we have employed and experimented with during our towing travels, and we are sure they will help you in the long run.
This is the best we could shorten up for you, but this is indeed not the end at all. We will soon be back with more amazing tips and tricks, but until then, ADIOS!