
RVing is a great way to travel and see the country. One of the best parts about owning an RV is that you can take your home with you wherever you go. That being said, there are some things you need to know about wiring 50 amp service for your RV.
This blog post will explore how to wire 50 amp service for your RV. We will cover what you need to know about the wiring process via the travel trailer 50 amp RV plug wiring diagram, as well as some tips and tricks to make sure it is done correctly.
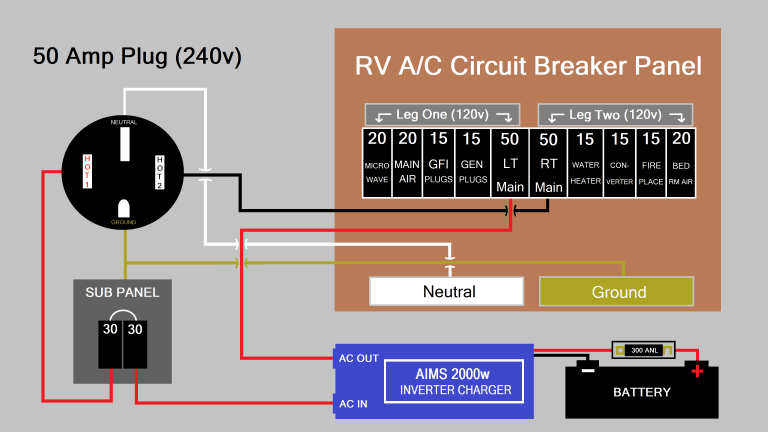
A 50 amp service is essentially two 50 amp circuits running side by side. Each circuit can provide up to 50 amps of power, for a total of 100 amps. This is enough power to run most RVs, including air conditioners, refrigerators, and other large appliances.
Essential Material Required
In order to wire amp service for your RV, you will need the following items:
- Amp Service Wire
- RV Hookup
- Wire Strippers
- Tape Measure
- Drill
- 1/2 inch Drill Bit
- Hammer
- Screwdriver
- Wire Ties
- Cable Clamps
Steps to Wire 50 Amp Service for an RV
Although it is not difficult, having a basic understanding of electricity is necessary to wire a 50-amp service for an RV. The best course of action is to employ a professional electrician to complete the work if you need more confidence handling electricity. Now, here is a step-by-step tutorial on wiring a 50-amp service for an RV if you’re up for the challenge:
Determine the Wire Size
The first step in wiring your RV’s amp service is determining the wire size. The wire size will be determined by the amount of current that will be flowing through it. To determine the amount of current, you’ll need to know the wattage of your RV’s AC unit and the number of amps it draws.
Once you have that information, you can use a simple calculation to figure out the wire size. First, just multiply the watts by the amps to get the total number of watts that will be flowing through the wire. Then, divide that number by 1000 to find the number of amps.
For example, if your RV’s AC unit is rated at 1500 watts and draws ten amps, then you’ll need a 15-amp circuit breaker and 12-gauge wire. If your RV’s AC unit is rated at 2000 watts and it draws 15 amps, then you’ll need a 20-amp circuit breaker and 10-gauge wire.
Choose Your Location
Now that you know what size circuit breaker and wire you’ll need, it’s time to choose a location for your new amp service. The best place for this is usually near your RV’s main electrical panel. This will make it easy to connect everything together later on.
Choose the Type of Wire
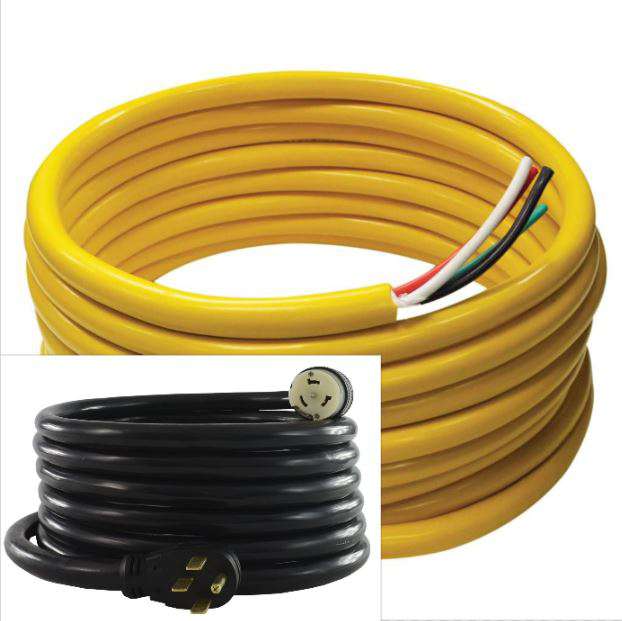
Three types of wire can be used for an RV amp service:
- Romex: This is the most common type of household electrical wire. It is made of two or more insulated wires twisted together with a bare ground wire. Romex is easy to work with and relatively inexpensive, making it a good choice for a DIY project like wiring an RV amp service.
- THHN/THWN: This is a heavier-duty version of Romex, often used in commercial and industrial applications. THHN/THWN wire is more durable and resistant to heat and moisture than Romex, making it a good choice for wiring an RV amp service in an outdoor environment.
- UF-B: This type of wire is designed for use in wet or damp locations. UF-B wire is resistant to corrosion and moisture, making it the best choice for wiring an RV amp service in an outdoor environment where the wire may be exposed to the elements.
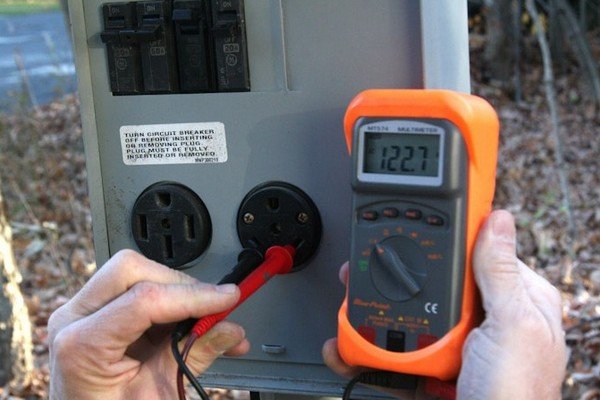
Install the Fuses
Installing the fuses is a critical step in wiring an amp service for your RV. First, you’ll need to identify the positive and negative terminals on your RV’s battery. Once you’ve done that, connect the battery’s positive terminal to the fuse box’s positive terminal. Then, click the battery’s negative terminal to the fuse box’s negative terminal.
It’s essential to make sure that the fuse box is properly grounded. To do this, you’ll need to connect a ground wire from the battery’s negative terminal to a metal surface on your RV. This will help ensure that any electrical current that flows through the fuse box is appropriately grounded and won’t cause any damage to your RV or its electrical components.
Once all of the connections are made, you can then install the fuses into the fuse box. Be sure to use fuses that are rated for use with automotive applications. These fuses are designed to handle higher currents than standard household fuses and will provide better protection for your RV’s electrical system.
Route and Attach the Wires
- Route the primary power wire from the battery to the location of the distribution block. Use lugs and ring terminals to connect the wire to the distribution block.
- Attach a second wire to the other side of the distribution block, and route it to the location of the amplifier. Use lugs and ring terminals to connect this wire to the amplifier’s power input.
- Connect a ground wire from the amplifier’s chassis to a nearby bare metal surface.
- Finally, attach your RCA cables between the amplifier and head unit, and plug in any necessary speaker wires. Make sure that all connections are secure before powering on your system!
Conclusion
If you’re considering wiring 50 amp service for your RV, there are a few things you need to keep in mind. First, make sure that your electrical panel can handle the increased amperage. Second, use thicker gauge wires to minimize resistance and heat build-up. Finally, be sure to follow all local building codes when installing your new service.
With a bit of planning and attention to detail, wiring 50 amp service for your RV is a relatively straightforward process.